28 May 2021

Creating a new LDAP server with FreeIPA and configure to allow vSphere authentication

Was setting up a new FreeIPA sever for my homelab and found out that the default configuration in FreeIPA does not allow you to use VMware vSphere as a client as not being fully RFC4519 and missing some other LDAP class settings.

Lets go through the steps of setting up a new FreeIPA server. We are going to use the official ansible repositories and collection for this purpose.

For this article we have the following assumptions:

  • Ansible host in the same subnet with the server that needs to be set up with FreeIPA.
  • ssh connectivity without password (ssh key) to FreeIPA server
  • FreeIPA server with CentOS 7 at freeipa.cloudalbania.com with minimum 1 Gb memory and 8Gb disk space
  • you already have vCenter up and running 

Preparing the Ansible host and FreeIPA repository

We are going to use the official ansible repository to install FreeIPA. On a host with ansible 2.9+ issue the following commands to install and setup initial FreeIPA server

Prepare the git repo and the inventory file
$ git clone https://github.com/freeipa/ansible-freeipa.git
$ cd ansible-freeipa
$ echo << EOF > inventory/my-freeipa-server
[ipaserver]
freeipa.cloudalbania.com

[ipaserver:vars]
ipaserver_domain=cloudalbania.com
ipaserver_realm=CLOUDALBANIA.COM
ipaadmin_password=<STRONG PASS>
ipadm_password=<STRONG PASS>
EOF

Install the ansible collections for freeIPA:
ansible-galaxy collection install freeipa.ansible_freeipa -p ./

Customize the ansible.cfg file:
$ cat ansible.cfg
[defaults]
host_key_checking = False
deprecation_warnings=False
collections_paths = ./
roles_path = ./roles
nocows=1

Installing FreeIPA

On the same directory of the ansible repo run the following to install the FreeIPA server:

$ ansible-playbook -u root -i inventory/my-freeipa-server playbooks/install-server.yml

After 3-4 minutes the server should be up and running


Check the installation on the server with the ipactl status command:

Finally login to your server at https://freeipa.cloudalbania.com with user admin@cloudalbania.com and the password we set in the ansible inventory

Main login screen

Main screen after login


Configure FreeIPA for RFC4519 and vSphere

The next steps are following as per this FreeIPA article to customize the directory schema for vSphere authentication.

$ echo << EOF > vsphere_usermod.ldif
dn: cn=users,cn=Schema Compatibility,cn=plugins,cn=config
changetype: modify
add: schema-compat-entry-attribute
schema-compat-entry-attribute: objectclass=inetOrgPerson
-
add: schema-compat-entry-attribute
schema-compat-entry-attribute: sn=%{sn}
-
EOF
$ echo << EOF > vsphere_groupmod.ldif
dn: cn=groups,cn=Schema Compatibility,cn=plugins,cn=config
changetype: modify
add: schema-compat-entry-attribute
schema-compat-entry-attribute: objectclass=groupOfUniqueNames
-
add: schema-compat-entry-attribute
schema-compat-entry-attribute: uniqueMember=%mregsub("%{member}","^(.*)accounts(.*)","%1compat%2")
-
EOF

Apply then with the following
$ ldapmodify -x -D "cn=Directory Manager" -f vsphere_usermod.ldif -W
and this

$ ldapmodify -x -D "cn=Directory Manager" -f vsphere_groupmod.ldif -W 

Run following commands as admin to allow the new sn attribute for compat users and uniqueMember for compat groups:

# ipa permission-mod "System: Read User Compat Tree" --includedattrs sn
# ipa permission-mod "System: Read Group Compat Tree" --includedattrs uniquemember
In case you have and error running the above commands then issue from the console the following command to authenticate first:
$ kinit admin 

Initial configuration for FreeIPA

At this point we need to create at least three resources in FreeIPA:
  1. A bind user that will be used to bind to the LDAP server, we are using bind-user@cloudalbania.com
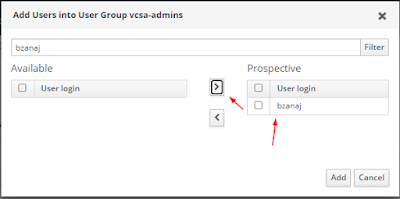
  2. An end user, in this case bzanaj@cloudalbania.com
  3. Two LDAP groups that will be used to add our users to vcsa-admins and vcsa-readonly.
We are doing this in order to not add individual users permissions and rather manage permissions in our LDAP server.

Users in FreeIPA:


Groups:

Then add the users to the groups:


Configure vSphere Authentication for FreeIPA

In the vSphere GUI go in Admistration -> Single Sign On -> Configuration -> Identity Providers and then Add.


In the next screen enter the following details as shown in the screenshot below:


Note: I am not using a certificate to authenticate on the LDAP server as it is out of the scope of this article.

After you save this configuration and there are no errors then you can assign the groups in the 

Permissions settings in Access Control


At the end we should see the following:


12 April 2021

Offline generation of Let’s Encrypt certificates


Sometimes we need to get a Let's Encrypt SSL certificate for a system that might not be connected in the internet or where the certbot client is not able to be installed. There is an easy way to generate a SSL chain that we can use in our internal applications.

Install certbot

On a linux system (even a temporary one) install certbot. The example below is performed on a Ubuntu 18.04 box.


$ sudo apt install certbot
$ certbot --version
certbot 0.27.0

We are going to generate a certificate for our host with a host name hostname.domain.com. Let's encrypt will allow an offline update through a DNS challenge so that means that during the certificate generation you should have an open screen of you DNS registrars/manager.

Initiate the request by the following command

$ sudo certbot certonly --manual --preferred-challenges dns -d hostname.domain.com
Saving debug log to /var/log/letsencrypt/letsencrypt.log
Plugins selected: Authenticator manual, Installer None
Obtaining a new certificate
Performing the following challenges:
dns-01 challenge for 
hostname.domain.com

- - - - - - - - - - - - - - - - - - - - - - - - - - - - - - - - - - - - - - - -
NOTE: The IP of this machine will be publicly logged as having requested this
certificate. If you're running certbot in manual mode on a machine that is not
your server, please ensure you're okay with that.

Are you OK with your IP being logged?
- - - - - - - - - - - - - - - - - - - - - - - - - - - - - - - - - - - - - - - -
(Y)es/(N)o: Y

- - - - - - - - - - - - - - - - - - - - - - - - - - - - - - - - - - - - - - - -
Please deploy a DNS TXT record under the name
_acme-challenge.
hostname.domain.com with the following value:

VUiRL_FOsDDlOFGYVhZCsIHVtfJ03usFLxkPfVvmOos

Before continuing, verify the record is deployed.

- - - - - - - - - - - - - - - - - - - - - - - - - - - - - - - - - - - - - - - -

Press Enter to Continue

Waiting for verification...


Now it is time to add the TXT record on your DNS server. As soon the record is there and you click enter the following will continue on your terminal

Cleaning up challenges

IMPORTANT NOTES:
- Congratulations! Your certificate and chain have been saved at:
/etc/letsencrypt/live/
hostname.domain.com/fullchain.pem
Your key file has been saved at:
/etc/letsencrypt/live/
hostname.domain.com/privkey.pem
Your cert will expire on 2021-07-11. To obtain a new or tweaked
version of this certificate in the future, simply run certbot
again. To non-interactively renew *all* of your certificates, run
"certbot renew"
- If you like Certbot, please consider supporting our work by:

Donating to ISRG / Let's Encrypt: https://letsencrypt.org/donate
Donating to EFF: https://eff.org/donate-le


An there you go the new private key and the certificate chain are in the default letsencrypt location at:

/etc/letsencrypt/live/hostname.domain.com/fullchain.pem
/etc/letsencrypt/live/hostname.domain.com/privkey.pem

In case you already have a CSR file from a device or server then just add the --csr to the above command with the csr file as argument:

$ sudo certbot certonly --manual --preferred-challenges dns -d hostname.domain.com --csr <csr_file.csr>


27 August 2020

Set up Foreman and manage it with Ansible

Managing Foreman recently and got bored to configure it each time I set it up from scratch.

This blog post will cover initial foreman install on a CentOS 7 server and then manage it with ansible through the foreman ansible collections.

The repository used in this article is locate here.

Servers recommendations

Minimum Foreman server hardware recommendations to support CentOS 7 & 8.

  • CentOS 7
  • 4 CPUs
  • 8Gb RAM
  • 100 Gb HDD
Minimum ansible server recommendations:

  • CentOS 7
  • 1 CPU
  • 256 Mb RAM
  • 8 Gb HDD

Setting up the Foreman server

Configure the OS

Create a CentOS 7 server with the above hardware setting and make sure to have a working DNS for that server or edit its own /etc/hosts with that hostname. For simplicity I am using foreman.cloudalbania.com -> 192.168.0.180.

$ cat /etc/hosts
...
192.168.0.180    foreman.cloudalbania.com    foreman

Reboot the server and make sure the new hostname is set.

Install Katello & Foreman

Next step is to install the foreman application with katello content management.
This is a pretty straightforward step:

Install repositories
yum -y localinstall https://yum.theforeman.org/releases/1.24/el7/x86_64/foreman-release.rpm
yum -y localinstall https://fedorapeople.org/groups/katello/releases/yum/3.14/katello/el7/x86_64/katello-repos-latest.rpm
yum -y localinstall https://yum.puppet.com/puppet6-release-el-7.noarch.rpm
yum -y localinstall https://dl.fedoraproject.org/pub/epel/epel-release-latest-7.noarch.rpm
yum -y install foreman-release-scl

Then update the OS and restart if any kernel or glibc upgrade
yum -y update

Install katello packages to prepare for the installation step later. This might take some time
yum -y install katello

Finally install foreman with katello. change the variables accordingly:
$ foreman-installer --scenario katello --foreman-initial-organization 'CloudAlbania' --foreman-initial-location 'YYZ' --foreman-initial-admin-username 'admin' --foreman-initial-admin-password 'password123' --foreman-foreman-url 'https://foreman.cloudalbania.com' -v

After 10-15 minutes the server should be up and running and reachable from your browser

Install and configure the ansible server

To manage the Foreman server you can already do all the configurations in the GUI. If you need to have a more documented and automated configuration then Ansible is the way.

In this guide I am using a CentOS 7 server.

$ yum -y install epel-release
$ yum -y install ansible git

Make sure the ansible host can connect to the foreman server without a password the sake of this guide. You can implement vaults or sudo users in a production environment for better security

Create your ansible workplace:
$ mkdir -p git/foreman
$ cd git /foreman

Install the foreman.ansible collections:
$ ansible-galaxy collection install theforeman.foreman

Install the ansible dependencies with pip:
$ pip install subnet ipaddress rpm deb apypie PyYAML

Now your ansible server should be ready to configure the foreman server.

Collections Usage

Full documentation for each individual module can be obtained with the ansible-doc command as follows:

ansible-doc theforeman.foreman.foreman_architecture

Your first playbook

In order to start configuring the Foreman server we can start with a Day 1 configuration item which is the Organization name.
NOTE: The Foreman collections do not need to connect to the foreman server itself rather we will use the local connection and then ansible will reach to foreman on port 443 (the API).

The first playbook we can start with is the definition of the Organization itself. Even though we have defined it in the setup command above, it is a good practice to have it defined in a configuration management system for consistency.

The playbook content:
[root@ansible foreman]# cat foreman1.yml
- name: Day 1
  hosts: localhost
  tasks:
    - name: "Create CI Organization"
      theforeman.foreman.organization:
        username: "admin"
        password: "password123"
        server_url: "https://foreman.cloudalbania.com"
        name: "{{ item }}"
        state: present
        validate_certs: no
      loop:
        - "CloudAlbania"
        - "Organization 2"

And when run we will see the below:


and in the foreman organizations list we will see:

If we run again the playbook there will be no changes

This is the end of this guide. Will follow up with a more detailed Day 1 configurations

Creating a new LDAP server with FreeIPA and configure to allow vSphere authentication

Was setting up a new FreeIPA sever for my homelab and found out that the default configuration in FreeIPA does not allow you to use VMware v...